Wednesday, June 22, 2016


Oracle SQL WITH Clause
       subquery factoring    or       Materializing subqueries

                               (Simplify complex SQL Subquery)


 Oracle offers three types of materialization:
Global Temporary Tables 
 The table definition is permanent.
Materialized Views 
 The definition and the data are permanent.
 The WITH clause 
 The materialized subquery data is persistent through the query.

-         It’s called Subquery Factoring  or Named Subquery
-         Allows you to give a sub-query block a name and call subquery with this name.
-         The SQL WITH clause is very similar to the use of Global temporary tables.
-         This technique often used to improve query speed for complex subqueries and make simplify complex SQL.
-         You can use subquery factoring (SQL WITH) when a subquery is executed multiple times within main Query.
-         You can create any number of named factoring queries.

Syntax
WITH
<alias_name> AS (sql_subquery_statement)
SELECT column_list FROM <alias_name>[,tablename]
[WHERE <join_condition>]


Use SQL WITH  as table Alias

(Change Table alias before use it in main query)

WITH
E AS (SELECT * FROM EMP WHERE SAL>1200)
SELECT * FROM E WHERE E.DEPTNO = 10
UNION
SELECT * FROM E WHERE E.DEPTNO = 90

 (Use SQL WITH as multiple Subqueries)
WITH
EM AS (SELECT * FROM EMP),
DP AS (SELECT DEPTNO FROM DEPT WHERE LOC = 'DALLAS')
SELECT * FROM EM,DP WHERE EM.DEPTNO IN (DP.DEPTNO)


(Make simplify complex SQL)

WITH
     m AS  (
                SELECT TO_CHAR (SYSDATE, 'mm') g_month FROM DUAL
                ),
     d AS (
                SELECT TO_CHAR (SYSDATE, 'dd')   g_day FROM DUAL
                ),
     y AS (
                SELECT TO_CHAR (SYSDATE, 'yyyy') g_year FROM DUAL
              )
  SELECT g_day || '/' || g_month || '/' || g_year dat
  FROM m, d, y


Wednesday, December 9, 2015

Oracle Toad Team Coding

Oracle Toad Team Coding


Sure you can use source control and Team work server with Toad IDE that helps Developers and database Administrators to manage code changes in Oracle Database with confidence of no overwriting the changes of other team members .
Developers and Admins can work with same Procedures , Functions , packages triggers and Types and check-in – check-out their source code …Developer can reserve his source code to prevent any other developer to overwrite same source code .

Setup Team Coding:
-      Login in Toad with DBA privileges (system , sys ..)
-      Setup will create a new database schema in Database server with “ Toad ” User Name (recommended to leave default name Toad) witch will be as metadata provides the functionality to team work .
-      This schema will be shared with all Work team without risk of override the      changes made by other developers .

--------------------------------------------------------------------------------------------------------
Remember : Developers could not edit source code unless 
check-out File or database objects
Source code will be locked after Checked-in
--------------------------------------------------------------------------------------------------------
 Let us Start
Steps:

Login to TOAD as sysdba (use DBA privileges )


Select Configure Team Coding: 
Utilities menu > Team Coding > Configure Team Coding

Following message will appear. Click OK:

Click on Install Team Coding:

It is preferable to install Team Coding objects in standard TOAD schema. Select the tablespaces for the Team coding metadata. The database role TC_ADMIN_ROLE is used for:
  1. 1.     Edit Team Coding Configuration
  1. 2.     Edit Code Collections
  1. 3.     Freeze Team Coding Objects
  1. 4.     Break another user’s Team Coding lock
-      Let us Test Team coding to record editing source code 


The script to generate the Team Coding Objects will be displayed on screen. Click Execute:

Enter the password for the TOAD database user:

Installation for Team Coding is completed (took less than a minute):

Now the database is configured to use Team Coding across all the schemas. Above steps are needed to be completed only once per database. Click on “Enable Team Coding for this Database”:

This setup is the basic setup, where working on a single object at a time gives enough control. Once you check out any object, it is available in Team Coding Dashboard.

-       Create new Procedure


-       Now press Check-in to lock your code and prevent update
-       

-                
-          Press Check in from toolbar or Team coding menu to lock your code 

Record comment on your code before check-in


-                                            To update source code – press chek-out


-                                     Previewed and open team coding – Edit History
-      


-       Now as you see , any edit in Database objects from any member in your team will record in team Coding 

Friday, November 27, 2015

ADF – Parent Action Activity in Bounded Taskflow

(ADF Region trigger parent navigation Control flow )


What if you need to trigger a parent Taskflow activity from ADF region or Child bounded task flow, 

Actually ADF Region could not see parent navigate flow case in a direct way.

Parent action activity is a component in ADF Taskflow components, which allow child bounded Taskflow to generate outcomes that used to navigate throw parent activity rather than child activity

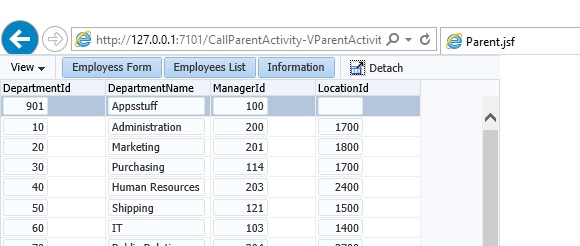
In this example I’ll create Parent Tasflow to preview departments as ADF region . and throw this region we can navigate into parent activity to EmployeesList Taskflow , Employees form page and global navigate page.

let us Start

  1. -          Create new ADF application “ CallPArentActivity”
  2. -          Create BC and create Employees and Departments VOs
  3. -          Create new Bounded Taskflow “Parent-TaskFlowDepartment ”(remove fragment option)
  4. -          Add Parent adf page activity as default (create page)
  5. -          Add “employeesForm” as adf page activity (create page)
  6. -          Add  “ employeesList “  as bounded Taskflow
  7. -          Add “information ”  as adf page activity (create page)


  1. -          Open employeesList bounded Taskflow
  2. -          Add “employeesPgae“ as adf page activity (create a apage)
  3. -          Add return activity
  4. -          Create flow-case “back” from emploeespage to retrun activity
  5. -          Drage employeesVO as table
  6. -          Add button and set action = back


  1. -          Create new bounded Taskflow with fragment Option “departmentTK”
  2. -     Add new  "departmentPage " as adf page activity 
  3. -          Add three Parent action Activities into Taskflow
  4. -          Add three navigation flow from departmentPage to parent Activities
-          goEmployeesList
-          goEmployeesForm
-          goInformation

     4-          set property <Parent Outcome> to refer to Parent outcome we need to trigger
                    
                         parentAction1.PrentOutcome = goList
                   parentAction1.PrentOutcome = goForm
                   parentAction1.PrentOutcome = goInfo


 - Set Action property to Flow case name in DepartmentPage


-  Drag DepartmentTF  as region into parent adf page 

Run and Test .................
now you can trigger parent navigation flow activity from Region or child bounded taskflow 
when you use Parent action activity ...


Tuesday, November 3, 2015

Install and Deinstall Oracle Patches use Opatch command.

Opatch (Apply Oracle Patches )

Install and Deinstall Oracle Patches use Opatch command.
(After complete this demo you will able to Apply oracle Patches on Middleware home or Jdeveloper Home)

Download patches
1-      Download your patch from Oracle Support .
             Login to Oracle Support > Patches and Updates
·         Go to search tab and write your patch number or search criteria.
·         Download your patch .


2-      Create a new folder in OS root to locate your patch , and unzip  patch file  into this folder

                                          C:\OraclePatches


               ------------------------------------------------------------

Pre Installation

3-      Set System environment variable ORACLE_HOME

-          Weblogic set variable to  your middleware directory (For Weblogic )

          Oracle_Home =  [MW_HOME]\ oracle_common  

-          Jdeveloper set variable to you Jdeveloper Home

        Oracle_Home =   [Jdeveloper_HOME]\jdeveloper


4-      Stop All managed servers and Admin Server before apply patch. I prefer to backup your MW_HOME directory.
                If you apply patch in Jdeveloper ,  please shutdown Integrated Weblogic  and close Jdeveloper IDE.

5-      Open cmd Command and set your current directory to directory where your patch is located .
                   
                                     cd  C:\OraclePatches\21768703\oui

6-      Use Opatch Apply command to apply current patch .
(may you will face a conflict when applying the patch ,because patch already applied before )

                       C:\OraclePatches\21768703\oui>opatch apply –Jdk [JDK path]


------------------------------------------------------------


  Post Installation
7-      For Jdeveloper: Open Jdeveloper and clean project and rebuild, then start Integrated Weblogic and run and test your application after patch and check problem is resolved .
8-       For standalone Weblogic server : start Admin Server , then start node manager , then start Managed Server . and check your Problem is resolved .
      
          ------------------------------------------------------------


List Patches installed in your Oracle_Home
   
             to list all patches installed in your Oeracle_Home 

                  Open cmd command and write command
   
                                 /> Opatch lsinventory


------------------------------------------------------------


Deinstall patch  

1-      Stop All managed servers and Admin Server before apply patch . If you apply patch in Jdeveloper ,  please shutdown Integrated Weblogic  and close Jdeveloper IDE.

2-      Open cmd Command and set your current directory to directory where your patch is located .

cd  C:\OraclePatches\21768703\oui

3-      Use Opatch rollback  command to deinstall current patch .

C:\OraclePatches\21768703\oui>opatch rollback –Jdk [JDK path]

4-      Clean you all files in tmp folder in OS User Directory

Jdeveloper  :
  [JDEV_USER_DIR]\DefaultDomain\servers\DefaultServer\tmp\*


Middleware:
  [MW_HOME]/user_projects/domains/[DOMAIN_NAME]/servers/[SERVER NAME]/tmp/*

               ------------------------------------------------------------

Post DeInstallation
1-      For Jdeveloper: Open Jdeveloper and clean project and rebuild, then start Integrated Weblogic and run and test your application after patch and check problem is resolved .
2-       For standalone Weblogic server : start Admin Server , then start node manager , then start Managed Server . and check your Problem is resolved .


O racle  SQL WITH Clause         subquery factoring     or         Materializing   subqueries                                 (Sim...