Tuesday, October 13, 2015

ADF create and register Managed bean


If you create a new java class and need to register it as ADF managed bean
you have many ways to do that , i'll mention a declarative way

  • Create new java Class
  • Add your custom business code


      Open adfc-config.xml


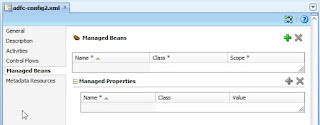
   Drag managed-bean component from component panel into structure window.


         a Managed Bean dialog will appear
         fill properties to register java class you created as managed bean
                       - Managed Besn Name 
                       - Class (select Class you created before)
                       - Select managed Bean Scope 


- Now Your new managed bean ready to use


ADF Error Icon Overlay Tracker NodeWatcher:802

If you use Versioning Control techniques like TortoiseSVN or ADF Repository …

Maybe you will face this exception when open Jdeveloper Application

Previously reported error [IllegalStateException in o.i.explorer.IconOverlayTracker$NodeWatcher:802]


 This will hang JDeveloper Application
                                              (In this figure I could not open project)


To Resolve this Error
  •            Open Preferences from Tools menu in Jdeveloper  IDE
  •            Chose General Subversioning from
    Version > SubVersion > General and Select General Tab


    UnCheck Use Navigator Status Overlay Icones Checkbox
    UnCheck Use Navigator Status Overlay Icones Labels


I prefer to restart Jdeveloper after this changes in Preference. Test and Check


Saturday, October 10, 2015

Clear ADF Form after Commit a new record


In this example I'll show you how to clear ADF form after Commite a new Row


Let us start :

1- Create new VO from DepartmentEO  (DepartmentInsertOnly)
2- Open Tuning  tab from VO and check option No Rows (Inserting new Rows Only)


3- Create new VO from DepartmentEO to preview Data (DepartmentReadOnly)
4- Shuttle these two VOs as instances in Data Model 


5- Create new JSF page (InsertDepartmentpage)
6- Drag DepartmentInsertOnly from Data control panel into page as adf Form .
7- Drag Commit and CreateInsert Operations into page .
8- Drag DepartmentReadOnly  from Data control as read only adf table.
9- Double click on commit button to create custom method inside a managed bean , to commit new row and refresh view object after clear cache.


10- Add this code under this method


 public String commitAction() {     
   BindingContainer bindings = getBindings();
        OperationBinding operationBinding = bindings.getOperationBinding("Commit");
        Object result = operationBinding.execute();
        refreshVO("DepartmentsViewInsertOnly"); // Iterator Name
        
         if (!operationBinding.getErrors().isEmpty()) {
            return null;
        }
        
        return null;
    }

   // refresh View Object
    private void refreshVO(String vo){

            DCIteratorBinding irt = (DCIteratorBinding)getBindings().get(vo);
            ViewObjectImpl view = (ViewObjectImpl)irt.getViewObject();
            view.clearCache();
            view.executeQuery();

        }


- Now please run and test

       As you see ADF Form still blank with now data , becuase it is for insert new row only


      Enter you data and press commit button


      ADF will clear VO Cache and re-execute . 


Sunday, September 27, 2015

Padding input String with java LPad and RPad methods


As Oracle database functions witch response for set right or left input text with  padding character,
This java method allow users to padding there input text .  this if type of formatting method for String .

1- Left padding : padds the input String to the left with given character for the specific length

 Method : public String rpad(String inputText , int Stringlen , char padding)
Parameters 
inputText  : the input text need to padding 
Stringlen   : the length of output String will be .
padding     : the charachter will use to padds the String

Return
String Type   : the new String with padded charachter .


- Right padding : padds the input String to the right with given character for the specific length

 Method : public String rpad(String inputText , int Stringlen , char padding)


Parameters 
inputText  : the input text need to padding 
Stringlen   : the length of output String will be .
padding     : the charachter will use to padds the String

Return
String Type   : the new String with padded charachter .


package appsstuff.com;

public class StringUtils {
   
    public String rpad(String inputText , int Stringlen , char padding){
       
        StringBuilder stringBuilder = new StringBuilder(inputText);
       
        if(inputText.equals(null)){
              return new String();
            }
        if (inputText.length() >= Stringlen){
               return inputText;
            }
           int paddingSpace= Stringlen -  inputText.length();    
           for (int i = 0 ; i <paddingSpace ; i++ ){
           
            stringBuilder.append(padding);  
                 }      
       
            return stringBuilder.toString();
       
        }
   
   
    public String rpad(String inputText , int Stringlen , String padding){
       
        StringBuilder stringBuilder = new StringBuilder(inputText);
       
        if(inputText.equals(null)){
              return inputText;
            }
        if (inputText.length() >= Stringlen){
               return inputText;
            }
           int paddingSpace= Stringlen -  inputText.length();    
           for (int i = 0 ; i <paddingSpace ; i++ ){
           
            stringBuilder.append(padding);  
                 }      
       
            return stringBuilder.toString();
       
        }


    public String lpad(String inputText , int Stringlen , char padding){
       
        StringBuilder stringBuilder = new StringBuilder();
       
        if(inputText.equals(null)){
              return inputText;
            }
        if (inputText.length() >= Stringlen){
               return inputText;
            }
           int paddingSpace= Stringlen -  inputText.length();    
           for (int i = 0 ; i <paddingSpace ; i++ ){
            stringBuilder.append(padding);  
                }      
       
            stringBuilder.append(inputText);  
            return stringBuilder.toString();
       
        }
    public String lpad(String inputText , int Stringlen , String padding){
       
        StringBuilder stringBuilder = new StringBuilder();
       
        if(inputText.equals(null)){
              return inputText;
            }
        if (inputText.length() >= Stringlen){
               return inputText;
            }
           int paddingSpace= Stringlen -  inputText.length();    
           for (int i = 0 ; i <paddingSpace ; i++ ){
            stringBuilder.append(padding);  
                }      
       
            stringBuilder.append(inputText);  
            return stringBuilder.toString();
       
        }
}


Example 
if you need to right padding input String with character * until length 10 .
assume input String  inputS= "1255"


String res = stringUtil. rpad(inputS , 10 , '*') ;
system.out.printLn(res);
----------------------------------------------
result will be
1255*******

if you change it to left padding with padding character #
String res = stringUtil. lpad(inputS , 10 , '#') ;
system.out.printLn(res);
----------------------------------------------
result will be
######1255



Monday, August 17, 2015

ADF Row STATUS_INITIALIZED and STATUS_NEW


First of all we should know the role of Entity Object , it’s an Business Component in Service layer represent one row within database table , contain attributes which represent  table fields .also it could contain transient attributes which aren’t persisted .

Each row in Entity's cache has a special status, we can see those statuses

0 STATUS_NEW    
            Default status when create a new row
1 STATUS_UNMODIFIED
            When current changes entity has been committed database , or when read from database.
2 STATUS_MODIFIED 
            When set or modified any attribute in entity         
3 STATUS_DELETED 
            When a row in entity flagged as deleted
4 STATUS_DEAD 
            When create new row and delete in same transaction
  

We have another entity state is Initialized,  what the different between new and initialized  ?

      When create a new row in an Entity Object the default status will be STATUS_NEW
This means row is added in the transaction's list of changes to be
validated or posted or committed.
This is fine and expected in most of the cases.
However, during complex business objects like master-detail there comes the situation where you may want to turn off these validations until both master and detail are available. For such situations to remove the row from transactions's list of changes (Pending row from Transaction’s List of changes)
 Use ADF APIs setNewRowStatus(ROW.STATUS_INITIALIZED).
It will change status to  Initialized status, until user will change attribute value

Setting row with Initialized status is useful, when we want to delay pending changes check.

For example,
Case one:
When new row is created with default values from PL/SQL functions - we don't want to consider it as candidate for pending changes in ADF, until user types value by himself.


Case Two:

When master-detail association is a composite association and situation demands to create the detail rows before the master row. In that case without setting the row status to STATUS_INITIALIZED you will face error:


JBO-25030: Detail entity  with row key null cannot find or invalidate its owning entity.


Remember :
When this row is in STATUS_INITIALIZED state and call setNewRowState(byte State) method with STATUS_NEW state then, this new row is added back into it's relevant transaction and validation manager and will then participate in validation, transaction cycle .
Note :
Note that incase of composition if a master/detail hierarchy is being created with the intention of making them temporary (STATUS_INITIALIZED) then the logic should be: Create Master row, insert Master row into a collection, create Detail row insert detail row into a relevant collection, make detail row initialized, create/insert/change-to-initialized more detail rows and at the end set the master row as initialized.

Saturday, August 15, 2015

ADF How to validate an old record only ... Record status


ADF  How to validate an old Record Only ... 

if you need to validate an old record only , In Oracle Entity object  - business rule you can validate new record only .

in this example we will check that user  can  set old salary value greater than 1000$ only

1- in EO Business rule set validation on Salary to compare Salary greeter than 1000$ .


2- in Validation Execution set Execution Condition :

import oracle.jbo.server.EntityImpl
adf.object.entityState != EntityImpl.STATUS_NEW


3- in Failure Handling set Error  Message  
Check Salary should greater than 1000$


Notes: in Groovy Expression you can check record Status 
we have Record Status 
STATUS_INITIALIZED
STATUS_NEW
STATUS_MODIFIED
STATUS_UNMODIFIED

you can check Status from EntityImpl Class

getEntityStatus() == STATUS_NEW


O racle  SQL WITH Clause         subquery factoring     or         Materializing   subqueries                                 (Sim...